![How to release a ROS 2 binary package [Part 3]](https://www.theconstruct.ai/wp-content/uploads/2023/03/How-to-release-a-ROS-2-binary-package-Part-3.jpg "How to release a ROS 2 binary package [Part 3]")

What we are going to learn
- How to generate a changelog file
- How to bump the package version
- How to run a first-time release using bloom
List of resources used in this post
- Use the rosject: https://app.theconstructsim.com/l/5562c7f1/
- The Construct: https://app.theconstructsim.com/
- ROS2 Courses –▸
- ROS2 Basics in 5 Days Humble (Python): https://app.theconstructsim.com/Course/132
- ROS2 Basics in 5 Days Humble (C++): https://app.theconstructsim.com/Course/133
Overview
This is the third part of a video that shows how to release a ROS2 package to the ROS build farm using bloom. Be sure to check the first and second parts if you haven’t yet:
- https://www.theconstruct.ai/how-to-release-a-ros-2-binary-package-part-1-2/
- https://www.theconstruct.ai/how-to-release-a-ros-2-binary-package-part-2-2/
Here we will explain how to generate a changelog file, bump the package version, and run a first-time release using bloom.
Acknowledgment
This video is based-off on ROS2’s official documentation, check it out at the link below:
ROS Inside!

ROS Inside
Before anything else, if you want to use the logo above on your own robot or computer, feel free to download it and attach it to your robot. It is really free. Find it in the link below:
Opening the rosject
In order to follow this tutorial, we need to have ROS2 installed in our system, and ideally a ros2_ws (ROS2 Workspace). To make your life easier, we have already prepared a rosject with a simulation for that: https://app.theconstructsim.com/l/5562c7f1/.
You can download the rosject on your own computer if you want to work locally, but just by copying the rosject (clicking the link), you will have a setup already prepared for you.
After the rosject has been successfully copied to your own area, you should see a Run button. Just click that button to launch the rosject (below you have a rosject example).

How to release a ROS 2 binary package – Part 3 – Run rosject (example of the RUN button)
After pressing the Run button, you should have the rosject loaded. Now, let’s head to the next section to get some real practice.
What is bloom?
Bloom is a build automation tool that will guide you through all necessary steps in the process of compiling the source code in the ROS build farms, packaging the code into binaries, and uploading them to the Debian archive. This way any users can easily install and uninstall it using the Debian package tools.
What is a build farm?
A build farm is a collection of one or more servers, which has been set up to compile computer programs remotely.
Assumptions
In order to follow this tutorial, we assume you have:
- An existing ROS2 Package, publicly available for everyone to use
- Git and GitHub basics knowledge
- You have completed the first part of the post (https://www.theconstruct.ai/how-to-release-a-ros-2-binary-package-part-1-2/):
- Created a release repository
- Started a new release team
- Installed the tools required on our machine
- Created a GIT access token to authenticate
- You have completed the second part of the video (https://www.theconstruct.ai/how-to-release-a-ros-2-binary-package-part-2-2/):
- Created a ros/rosdistro source entry
Recap from part 1: Install the tools required on your machine
After having opened the rosject, let’s start running some commands in the terminal. For that, let’s open a terminal by clicking the Open a new terminal button.
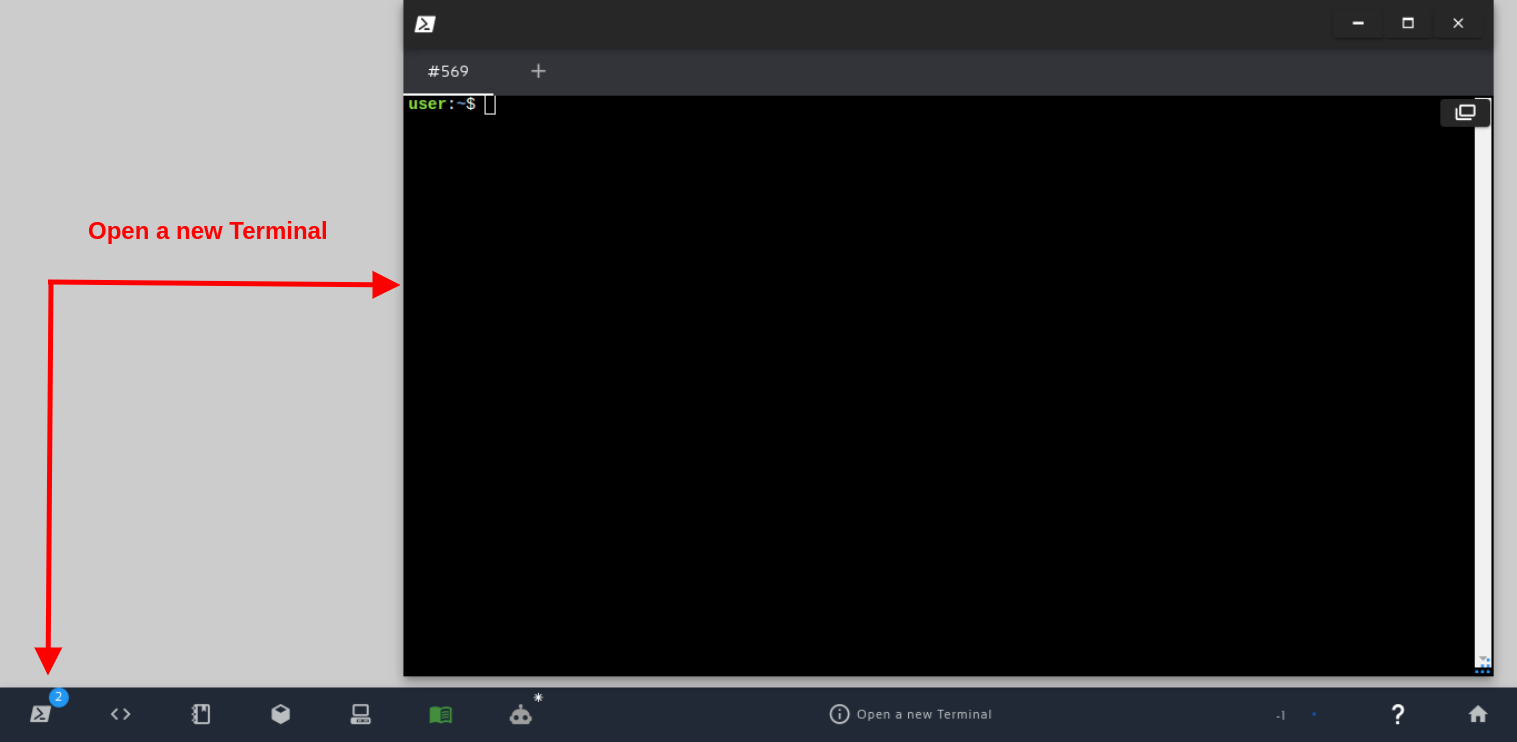
Open a new Terminal
Once inside the terminal, let’s run the commands below, use apt to install bloom together with the python3-catkin-pkg modules if you haven’t done so already.
sudo apt update
sudo apt install python3-bloom python3-catkin-pkg
New addition step: Since we are using a version of bloom older than 0.6.8 we need to use the v4 index URL for releasing:
export ROSDISTRO_INDEX_URL='https://raw.githubusercontent.com/ros/rosdistro/master/index-v4.yaml'
Recap from part 2: Incorporate feedback
If you followed the second part of this video, you created a pull request to add a ros/rosdistro source entry. Remember that you have to make the changes requested by the reviewer to get your pull request merged. This part assumes that your pull request has been successfully merged to the ros/rosdistro repository.
Important: The issues created in part 1 and part 2 must be shown as completed.
Verify your repository is up to date and your code builds
This might seem like an obvious one, but it’s easy to overlook. Ensure you have committed your changes and pushed the last commit to your remote.
Additionally, confirm your new code builds and executes right before making it available to the build farm.
cd ~/ros2_ws/src

git clone https://github.com/rfzeg/wall_follower_ros2
cd ~/ros2_ws

colcon build; source install/setup.bash
IMPORTANT!!!
Here we cloned the https://github.com/rfzeg/wall_follower_ros2 package. You cannot release the same package from the same URL because it has been already released by ROS, which means some parts of this tutorial may not work 100% if you close the same repository.
To make sure it works, you have to close your own repository instead of the one above. Please use the same repository you used in the previous posts of this series, for example.
Starting the simulation
After having opened the rosject and making sure the workspace builds with no problems, let’s start a simulation using the same terminal that you have already opened previously.
Let’s run the following commands in order to launch the simulation:
source ~/ros2_ws/install/setup.bash

source /usr/share/gazebo-11/setup.bash

ros2 launch wall_follower_ros2_tests miniworld.launch.py
Now, in a second terminal, let’s make sure our wall follower is working properly:
ros2 run wall_follower_ros2 wall_follower_ros2 --ros-args -r scan:=/lidar_1/out
If everything went well, you should see the robot moving around, and when it gets close to the wall, it turns and keep moving:
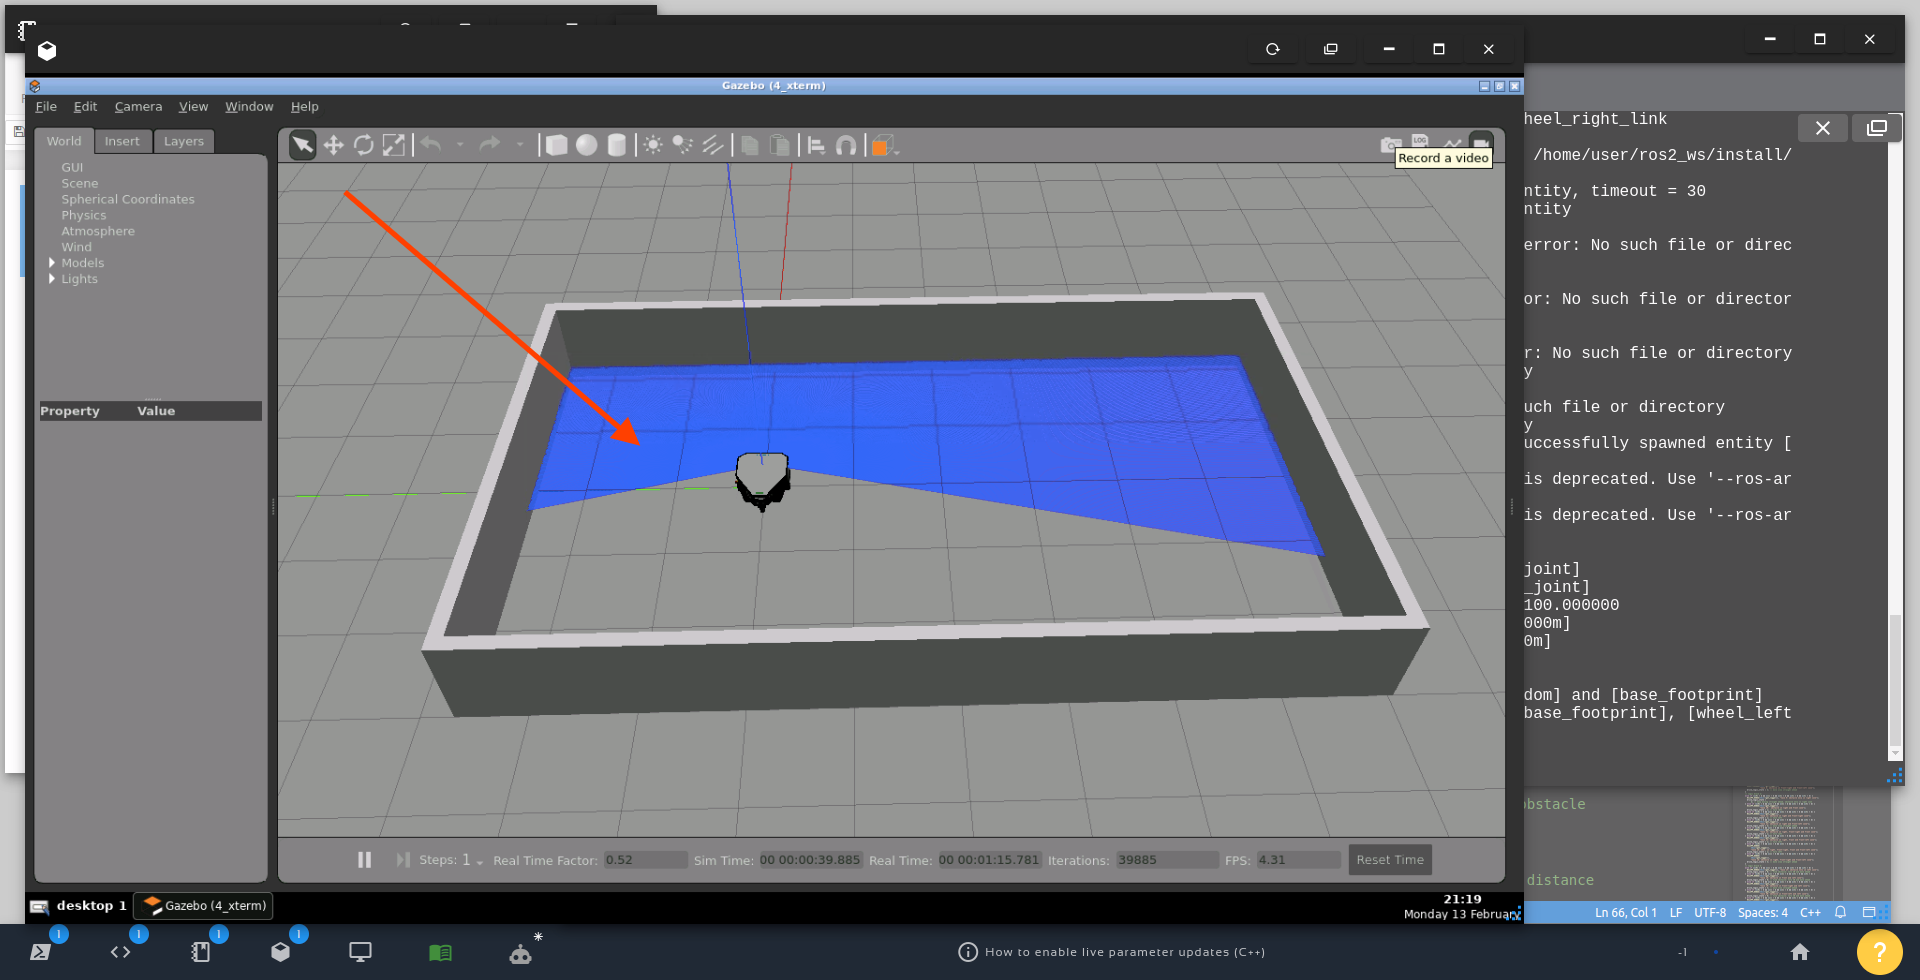
Wall follower using ROS 2
It is always a good idea to verify if there are new changes since the last commit. Let’s try that in the same second terminal. For that, first press CTRL+C to kill the current process, and then run the commands below:
cd ~/ros2_ws/src/wall_follower_ros2
git status
When you have added all of the changes to a commit, the Git status command line will inform you ‘nothing to commit, working tree clean‘ :
On branch master
Your branch is up to date with 'origin/master'.

nothing to commit, working tree clean
Generating the Changelog
We are now going to generate a Changelog. A changelog is a file that contains a condensed list of all important changes made to a project in a chronologically ordered way. Its purpose is to communicate to other developers what features have been added, improved, or removed over time.
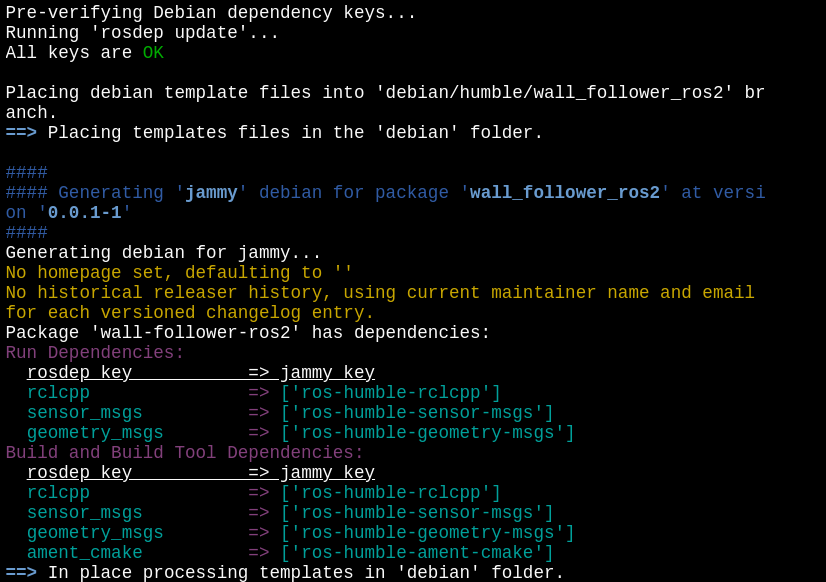
To auto-generate the CHANGELOG.rst files, use the "catkin_generate_changelog --all" command.
Make sure to run this command from inside the home directory where the package files are located:
cd ~/ros2_ws/src/wall_follower_ros2
catkin_generate_changelog --all
If everything went well, we expect to have the following output:
Found packages: wall_follower_ros2
Querying all tags and commit information...
Generating changelog files with all versions...
- creating './CHANGELOG.rst'
Done.
Please review the extracted commit messages and consolidate the changelog entries before committing the files!
A new CHANGELOG.rst file will be automatically created for every package within the repository. The above command will also populate the file with the contents of your commit messages.
The above command will generate a CHANGELOG.rst file. If we open that file using the Code Editor, or by typing “cat CHANGELOG.rst“, we should see something similar to the following, for instance:
^^^^^^^^^^^^^^^^^^^^^^^^^^^^^^^^^^^^^^^^
Changelog for package wall_follower_ros2
^^^^^^^^^^^^^^^^^^^^^^^^^^^^^^^^^^^^^^^^


Forthcoming
-----------
* Merge pull request `#1 <https://github.com/rfzeg/wall_follower_ros2/issues/1>`_ from rfzeg/master
  Master to main
* Feat: stop robot when a CTRL+C signal is received
* Fix safety_distance parameter value
* Add parameter to reverse ranges array in case it starts with rays at the left side
* Refactor: rename, reformat and rearrange code
* Add Timer Callback to set movement state, fill vel msg, publish vel msg
* Refactor laser_callback to get the distance reading to the closest object and the ray's position index
* Rename set_drive_state() -> set_drive_logic_state(), RCLCPP_INFO() -> RCLCPP_DEBUG() logs
* Rename set_velocity() -> determine_vel_msg(), rewrite debug logs
* Rename package to 'wall_follower_ros2'. Set version to 0.0.0 in package.xml
* Add info & debug log messages
* Add logical behavoir depending upon 5 zones around the robot, set velocity command
* Add log info & debug statements
* Refactor parameter value retrieval
* Add safety distance parameter
* Add default parameter values
* Add minimal rule based obstacle avoidance node (c++)
* Add initial ROS2 package files, Readme, License & Git configuration
* Contributors: Roberto Zegers, Roberto Zegers R
Note: The changelog is basically a list of commits. I you want to compare it with your log messages, have a look at the Git log history using git log –oneline:
git log --oneline
So, the changelog is basically a list of commits, but you can definitely remove some of the commits in the changelog if you want, however, you must not remove the Forthcoming header.
AGAIN!!! Make sure you do not modify the Forthcoming header.
In this example I reduced the list of changes to only include the most important things as shown below:
Forthcoming
-----------

* Add initial version with logical behavoir depending upon 5 zones around the robot
* Contributors: Roberto Zegers
If you are interested you can consult the following page for additional information: Incorporation of Changelogs into Package Source Tree
Commit
If you have modified the changelog, then you must commit CHANGELOG.rst changes giving it an appropriate commit message such as “Add Changelog”.
git add CHANGELOG.rst
git commit -m "Add Changelog"
Bump the package version
cat ~/ros2_ws/src/wall_follower_ros2/package.xml | grep version
<version>0.0.0</version>
Now, in order to automatically bump the package version, we can use the following command, but be aware that the command will ask you for your github credentials. That is why we mentioned previously that you would have to clone your own repository instead of the one we are using in this example (https://github.com/rfzeg/wall_follower_ros2):
cd ~/ros2_ws/src/wall_follower_ros2

catkin_prepare_release
According to the ROS2’s documentation, this command performs the following:
- Increases the package version in package.xml. The above command will increment the patch version of the package from its default value of 0.0.0 to 0.0.1.
- Replaces the heading Forthcoming with version (date) (eg. 0.0.1 (2022-01-08)) in CHANGELOG.rst
- Commits those changes
- Creates a Git tag (eg. 0.0.1) to mark this point in the Git history
- Pushes the changes and the tag to your remote repository
You can show the changes made to the repository like this:
git diff HEAD^ HEAD
If you want to verify the tag that Git just added, run the command below, which will list the available tags in your Git repository:
git tag
Sidenote on semantic versioning
A semantic version number has three parts delimited by a dot, for instance:
1.2.5
Where 1 stands for a Major version, 2 represents the Minor version and 5 is the Patch. Let’s understand these labels:
Patch: Patch updates are interchangeable, meaning consumers can upgrade or downgrade freely. Example: Bug fix, performance improvement, or internal tweaks.
Minor: Minor updates are backward compatible, meaning consumers can upgrade freely. For instance new additional API methods, without changing the current methods.
Major: Major updates are non-compatible, meaning consumers can not upgrade without changing the software that uses the API, where applicable. You normally have interface changes breaking backward compatibility, like changes in an API endpoint name or signature, removal of an endpoint, etc.
To increment the major version, for instance in the first major release, run:
catkin_prepare_release --bump major
Similarly, the minor version gets incremented when you execute:
catkin_prepare_release --bump minor
Run the bloom-release command
Run the following command, the <my_repository> should be replaced with the name of your repository:
bloom-release –new-track –rosdistro humble –track humble <my_repository>
Note that <my_repository> is not an URL, but the repository reference in distribution.yaml.
In this particular example, the command to be executed is:
bloom-release --new-track --rosdistro humble --track humble wall_follower_ros2
The above command will create a release for ROS2 Humble. Let’s have a quick breakdown of the flags we used:
- –new-track is important for a first-time release to create a new track before running bloom. What is a track? Bloom is designed to allow the release of the same package for different ROS distributions and versions in the same release repository. To facilitate this, bloom uses release “tracks” to maintain configurations for different release processes.
- –rosdistro humble indicates that this release is for the humble distro. Replace as appropriate.
- –track humble indicates that you want the track name to be humble
Note: For later releases, you don’t need the --new-track flag. However, if you want to add a new distribution to an already released package (see documentation) and configure it, you will have to include the --new-track option again.
Once executed, it will look at the distributions.yaml file for your project key. If it doesn’t find it, it’ll look in other distributions. If it finds one, it’ll prompt you to approve it. If not, you will be asked to enter a release repository URL:

Looking for a release of this repository in a different distribution
In this particular example, we have to add the following. Note that you should replace this with the name of your repository.
AGAIN!!! Note that you should replace this with the name of your repository.
Our ros2-gbp release repository is at:
https://github.com/ros2-gbp/wall_follower_ros2-release.git
What follows are prompts that are meant to configure the new release track.
Configure the new release track
You will be asked to enter some basic information required to configure a new track. In the example shown we should respond to the prompts as follows:
- Repository Name: the name of the repository in which the package is: wall_follower_ros2
- Upstream Repository URI: Our repository is hosted on GitHub at https://github.com/rfzeg/wall_follower_ros2, but please remember to insert the URL of your own repository
- Upstream VCS Type: [Enter]
- Version: [Enter]
- Release Tag: [Enter]
- Upstream Devel Branch: master
- ROS Distro: [Enter]
- Patches Directory: [Enter]
- Release Repository Push URL: [Enter]
The whole process will take a while because it runs quite a few commands, for instance:
==> git-bloom-release humble
==> bloom-export-upstream
==> git-bloom-import-upstream
==> git-bloom-generate -y rosrelease humble --source upstream -i 1
==> git-bloom-generate -y rosdebian --prefix release/humble humble -i 1--os-name ubuntu
It will also check if all dependencies can be satisfied by running rosdep update:
Running rosdep update to release a ros2 binary package
You should continue to see lots of dumping messages/logs on the terminal:
==> git-bloom-generate -y rosdebian --prefix release/humble humble -i 1--os-name debian --os-not-required
==> git-bloom-generate -y rosrpm --prefix release/humble humble -i 1 --os-name fedora
==> git-bloom-generate -y rosrpm --prefix release/humble humble -i 1 --os-name rhel
<== Released 'wall_follower_ros2' using release track 'humble' successfully
Then you will be asked if you want to push to the release repository. Just type Y and [Enter] to pass this prompt:
Releasing complete, push to release repository?
Continue [Y/n]? Y
The script will continue its execution:
==> git push --tags
We don’t have documentation information, and that’s okay:
Would you like to add documentation information for this repository? [Y/n]? n
You might encounter a prompt message like this one:
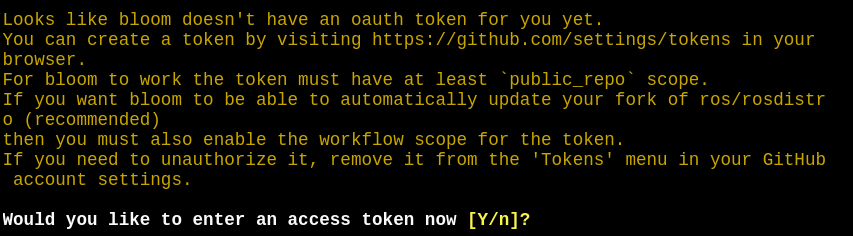
Enter an access token prompt
Go to http://github.com/settings/tokens to create a token if you haven’t done it so far.
This token will be saved in the bloom config file in your local machine: ‘/home/user/.config/bloom‘
Then, finally, you will be asked to confirm the creation of a pull request:

Open a pull request prompt
A few more commands will be run:
==> Pulling latest rosdistro branch
==> Writing new distribution file: humble/distribution.yaml
==> git add humble/distribution.yaml
==> Pushing changes to fork
At the very end of the process, you should see a message similar to this:
<== Pull request opened at: https://github.com/ros/rosdistro/pull/xxxxx
In our case, the Pull Request URL was the following:
Note: The release process begins recording logs as soon as you run it. Bloom log files are saved in your local machine to this directory: '/home/user/.bloom_logs'
The pull request page
Click on that link and you will see the current status of your pull request:
ROS ROSDISTRO Pull Request on GitHub
Now you will have to wait for someone from the ROS release team to review/merge the pull request.
This can take some time, so you may have to wait a bit.
If required you will have to update the PR to address the comments. That is all for today’s post.
Congratulations. You just learned the third part of how to publish your ROS 2 binary package.
We hope this post was really helpful to you. If you want a live version of this post with more details, please check the video in the next section.
Youtube video
So this is the post for today. Remember that we have the live version of this post on YouTube. If you liked the content, please consider subscribing to our youtube channel. We are publishing new content ~every day.
Keep pushing your ROS Learning.
Related Courses & Training
If you want to learn more about ROS and ROS2, we recommend the following courses:
-
- ROS2 Basics in 5 Days Humble (Python): https://app.theconstructsim.com/Course/132
- ROS2 Basics in 5 Days Humble (C++): https://app.theconstructsim.com/Course/133
- Open-RMF / Fleet Management Training: https://www.theconstruct.ai/robot-fleet-management-ros2-open-rmf-training/

Get ROS2 Industrial Ready- Hands-On Training by The Construct cover.png


0 Comments