

What we are going to learn
- What is a Debian package and what is it used for
- How to get the building dependencies
- How to initialize rosdep
- How to create a Debian installable package
- How to install a ROS2 package from a local Debian installable file
List of resources used in this post
- The previous part of this series: https://www.theconstruct.ai/how-to-release-a-ros-2-binary-package-part-2-2/
- Use the rosject: https://app.theconstructsim.com/l/5142d6f5/
- The Construct: https://app.theconstructsim.com/
- ROS2 Courses –▸
- ROS2 Basics in 5 Days (Python): https://app.theconstructsim.com/#/Course/73
- ROS2 Basics in 5 Days (C++): https://app.theconstructsim.com/#/Course/61
- ROS2 Navigation (Galactic): https://app.theconstructsim.com/Course/109
- ROS2 Navigation training: https://www.theconstruct.ai/ros2-navigation-training/
Overview
ROS2, the improved version of ROS (ROS1), is quickly becoming the standard for developing robotics applications.
In this post, we will take a look at how to build a local Debian package out of a ROS 2 package that you have in your system. Private Debian packages (*.deb files) are easy to share, install, upgrade and uninstall without you having to share any source code.
You can easily install them with sudo dpkg -i pkg-name.deb, for example.
It is highly recommended that you follow the previous posts of this series:
- https://www.theconstruct.ai/how-to-release-a-ros-2-binary-package-part-1-2
- https://www.theconstruct.ai/how-to-release-a-ros-2-binary-package-part-2-2/
ROS Inside!

ROS Inside
Before anything else, in case you want to use the logo above on your own robot or computer, feel free to download it for free and attach it to your robot. It is really free. Find it in the link below:
Acknowledgment
This post is based on ROS2’s official documentation, check it out here:
This notebook is based on the official instructions.
Opening the rosject
In order to follow this tutorial, we need to have ROS2 installed in our system, and ideally a ros2_ws (ROS2 Workspace). To make your life easier, we already prepared a rosject with a simulation for that: https://app.theconstructsim.com/l/5142d6f5/.
You can download the rosject on your own computer if you want to work locally, but just by copying the rosject (clicking the link), you will have a setup already prepared for you.
After the rosject has been successfully copied to your own area, you should see a Run button. Just click that button to launch the rosject (below you have a rosject example).

Learn ROS2 Topics vs Service vs Action – Run rosject (example of the RUN button)
After pressing the Run button, you should have the rosject loaded. Now, let’s head to the next section to get some real practice.
Compiling the ros2_ws (ROS 2 Workspace)
In the rosject link shared above, we have the ros2_draw_squares package developed by GitHub user samialperen. The package will be used in our example and can be found at https://github.com/samialperen/ros2_move_robot.
Let’s start by compiling the ros2_draw_squares package that is inside the ~/ros2_ws/src folder. In order to do that, we need a terminal. You can open one by clicking the Open a new terminal button.
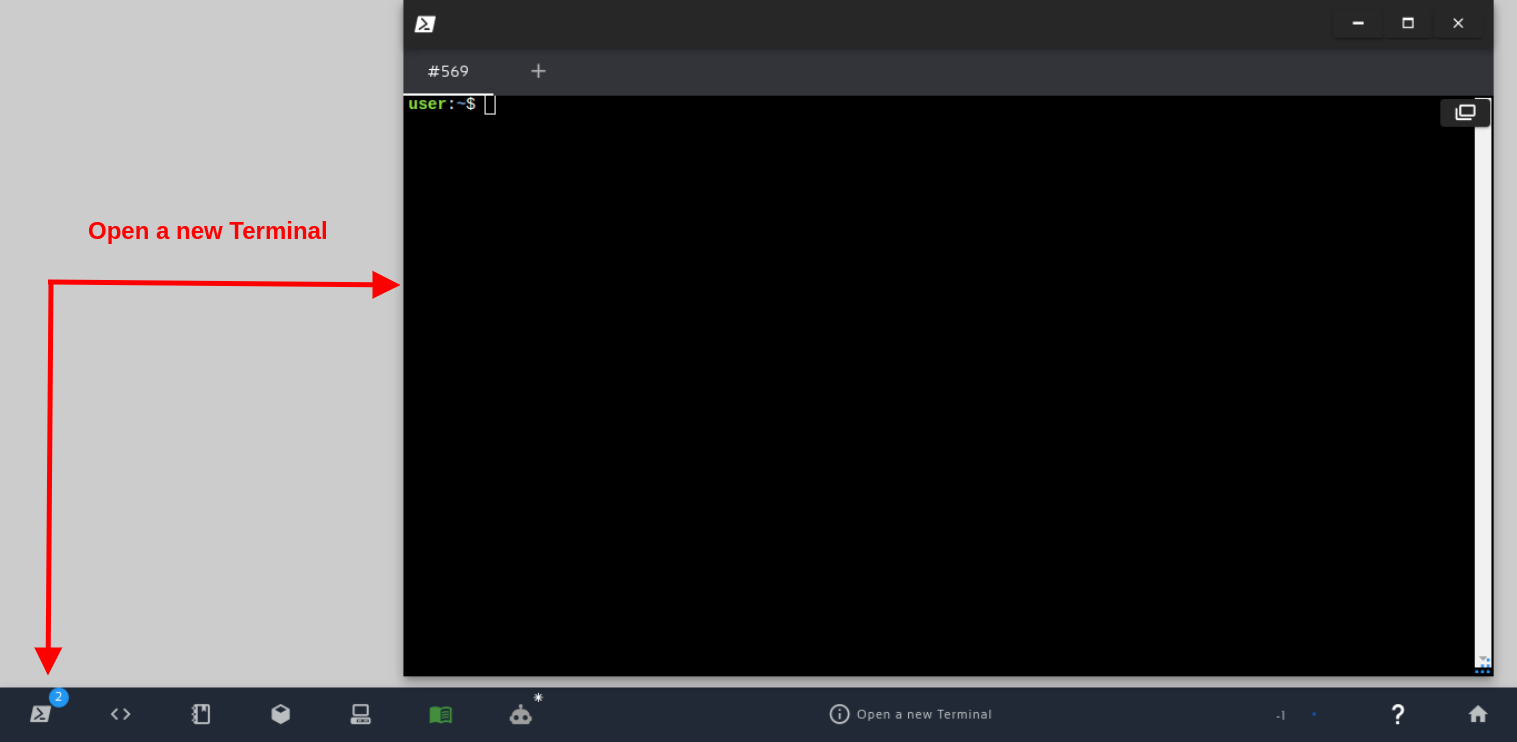
Open a new Terminal
Once the terminal is open, we can compile the package using the following commands:
cd ~/ros2_ws
colcon build
source install/setup.bash
Starting the simulation
Before showing the process of creating the Debian file, let’s see it in action first through a robot simulation.
Let’s start by exporting the GAZEBO_MODEL_PATH variable to the location of the turtlebot3 model files, so that the Gazebo Simulator can show the robot properly:
source install/setup.bash
export GAZEBO_MODEL_PATH=/home/user/ros2_ws/src/turtlebot3_simulations/turtlebot3_gazebo/models:${GAZEBO_MODEL_PATH}
export GAZEBO_RESOURCE_PATH=/home/user/ros2_ws/src/turtlebot3_simulations/turtlebot3_gazebo:${GAZEBO_RESOURCE_PATH}
Now let’s set the TURTLEBOT3_MODEL to waffle:
export TURTLEBOT3_MODEL=waffle
We can now finally start the simulation with the following command:
ros2 launch turtlebot3_gazebo empty_world.launch.py
You should see the Gazebo simulator pop up with an empty world.
Now, open a second Terminal, and run the service server node using the command below:
ros2 launch ros2_draw_squares move_robot_in_square_service_server.launch.py
And from a third terminal, we can run the service move_robot_in_square.
ros2 service call /move_robot_in_square std_srvs/srv/Trigger '{}'
If everything went ok, in the simulation window you should have seen the Turtlebot robot moving in a square-like format.
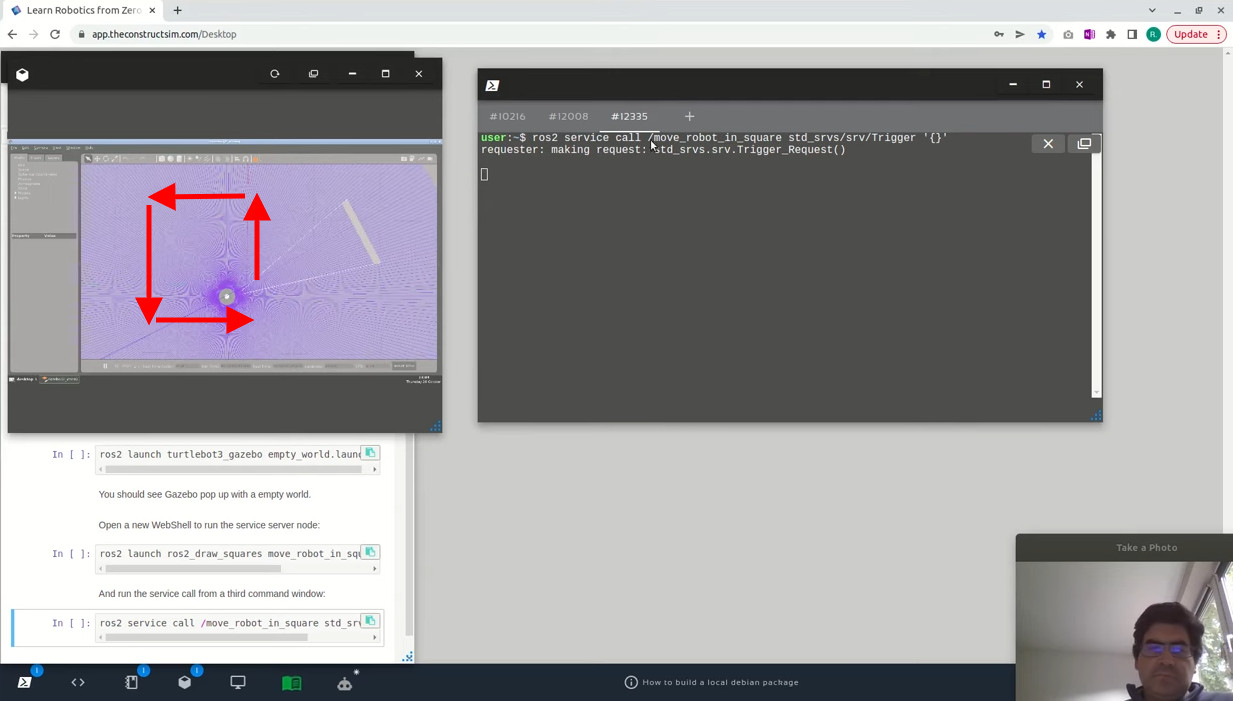
Turblebot robot moving in a square-like format
Alright, we already saw the package in action. Now let us see the process of converting it into a Debian file.
Feel free to kill the existing simulation by pressing CTRL+C in the three terminals.
What is a Debian package and what is it used for?
A .deb file in essence it’s a very simple and easy way of distributing software in Debian-based Linux distributions. You can think of it as a file similar to a .tar file which is a format used to store multiple files in one single file. Using a Debian package we can install a ROS2 package in our environment without having to have the source files.
-ros2_draw_squares
 |-package.xml
 |-launch
 | |-call_move_robot_in_square_service_server.launch.py
 | |-move_robot_in_square_service_server.launch.py
 |-include
 | |-ros2_draw_squares
 | | |-move_robot.hpp
 |-README.md
 |-src
 | |-move_robot.cpp
 | |-move_robot_in_square_service_server.cpp
 | |-move_robot_in_square_service_client.cpp
 | |-move_robot_node.cpp
 |-CMakeLists.txt
Deb files also hold metadata about the software they provide. By the use of metadata, Debian packaging handles the installation, removal, and dependencies of packages.
Get the building dependencies
sudo apt update
sudo apt install python3-bloom python3-rosdep fakeroot dh-make
This will install the tools python3-bloom python3-rosdep, fakeroot, and dh-make packages.
Since this can take a while to install, you just have to wait a bit for it to finish.
Check the ROS2 package dependencies
All of the dependencies of the package should be properly declared in the package.xml file of the ROS 2 package.
Still in the first terminal, let’s see the dependencies that we have for our package:
cat ~/ros2_ws/src/ros2_draw_squares/package.xml
We just have to make sure all package dependencies are listed using the correct dependency tag. If when creating your own package you are not sure what kind of dependency a package is, you can use <depend> tag to specify that the dependency is a build, export, and execution one.
Initialize rosdep
Let’s initialize rosdep. That can still be done in the first terminal:
sudo rosdep init
You might see the following error if rosdep has already been initialized in the past:
ERROR: default sources list file already exists:
        /etc/ros/rosdep/sources.list.d/20-default.list
Please delete if you wish to re-initialize
Don't worry. This error message can be ignored since it has no effect whatsoever.
Create a Debian installable package
In order to creat the Debian package, let's start by moving to your package root directory, which is the directory that contains the package.xml file (using the first terminal):
cd ~/ros2_ws/src/ros2_draw_squares
After that, let’s use the bloom-generate command:
bloom-generate rosdebian
The expected output is something similar to the following:
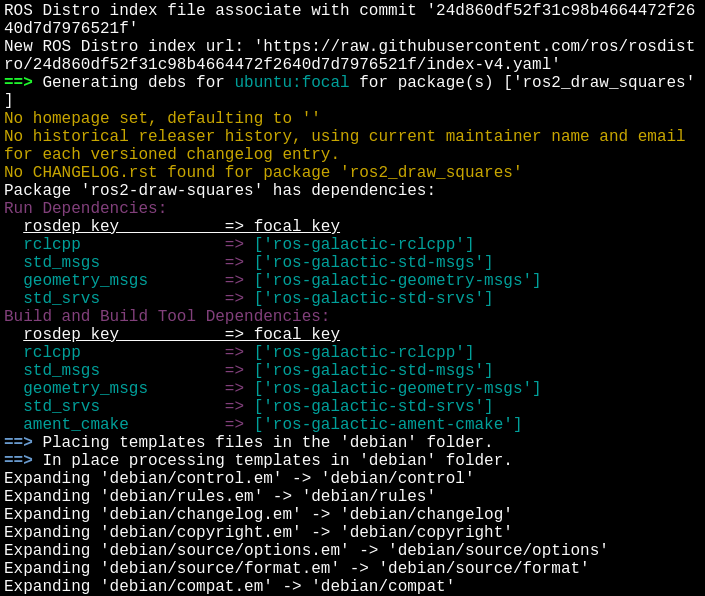
bloom-generate rosdebian output
If for whatever reason you get an error message like the one below:

Could not resolve rosdep key
This means that rosdep could not find that particular package dependency. Verify if the package must be indexed in the rosdistro by creating a PR.
After successfully running the above command, you should get a directory named debian in the current directory, which contains the compiled files and rules required to create the Debian file. The “ls” command output should be like this:
CMakeLists.txt README.md debian include launch package.xml src
Use the following command to create a Debian package:
fakeroot debian/rules binary
We should see something similar to the following animation:
fakeroot expected output
After a while, the command should finish with no errors.
The command we just executed should have created a .deb file in the directory that is one level above. We can check it with:
cd ..

ls
Which should show us the following:

Debian file created
Install a ROS2 package from a local Debian installable file
Alright, our Debian file has been successfully generated.
Let us install this Debian package on our own machine by using the package management program called dpkg:
sudo dpkg --install ros-galactic-ros2-draw-squares_0.0.0-0focal_amd64.deb
This will install the Debian package (including unpacking and configuring) onto the file system of the hard disk.

dpkg install output
After having installed the Debian package, it is ready to be used in our environment. Let’s find out where the package got installed. To do so we first need to get the package name:
dpkg --info ros-galactic-ros2-draw-squares_0.0.0-0focal_amd64.deb
Once we have the name, we can display where the files in the deb package got installed to:
dpkg -L ros-galactic-ros2-draw-squares
We can see that this package is now installed in the same location where the main ROS 2 installation is located.
Finally, in case you want to uninstall this package, we can easily do it also with dpkg:
sudo dpkg -P ros-galactic-ros2-draw-squares
And if you want to take it further from here, you can even create your own apt repository to host your private ROS2 .deb packages, but that’s a story for another time.
Congratulations on reaching the end of this tutorial. We hope this post was really helpful to you.
If you want a live version of this post with more details, please check the video in the next section.
Youtube video
So this is the post for today. Remember that we have the live version of this post on YouTube. If you liked the content, please consider subscribing to our youtube channel. We are publishing new content ~every day.
Keep pushing your ROS Learning.
Related Courses & Training
If you want to learn more about ROS and ROS2, we recommend the following courses:
- ROS2 Basics in 5 Days (Python): https://app.theconstructsim.com/#/Course/73
- ROS2 Basics in 5 Days (C++): https://app.theconstructsim.com/#/Course/61
- ROS2 Navigation (Galactic): https://app.theconstructsim.com/Course/109
- ROS2 Navigation training: https://www.theconstruct.ai/ros2-navigation-training/


0 Comments