
In this post, we will see how to get an RGB camera working in ROS2 and RVIZ2. You might already be used to doing this in ROS1 and RVIZ1, and it’s easy-peasy. In ROS2 however, it’s a bit tricky and you are about to learn how to break the codes.
Step 1: Grab a copy of the ROS Project containing the code
Click here to get your own copy of the project (PS: If you don’t have an account on the ROS Development Studio, you would need to create one. Once you create an account or log in, we will copy the project to your workspace).

That done, open the project using the Run button. This might take a few moments, please be patient.
You should now see a notebook with detailed instructions. This post includes a summary of these instructions and some other tips.
Step 2: Explore the source code using the IDE

Open the IDE by clicking on the icon as shown above. You should now see something similar to the image below:
All the files used in the simulation are in the ros2_ws/src directory. Explore the files. Double-click to open a file in the editor. You will refer back to some of the files later on.
Step 3: Study the main files needed to get an RGB camera working in ROS2 and RVIZ2
There are two main things you need to do to get this working:
- Add the camera to the URDF file (and launch the URDF file) so we can have the camera in Gazebo
- Create a robot state publisher node for the robot so we can visualize it in Rviz2
Let’s see these steps in details.
All the code for the simulation is in ros2_ws/src/box_bot/. Let’s examine the main files related to launching the camera, so you can understand how to implement yours.
ros2_ws/src/box_bot/box_bot_gazebo/launch/box_bot_launch.py
#!/usr/bin/python3
# -*- coding: utf-8 -*-
import os  from ament_index_python.packages import get_package_share_directory
from launch import LaunchDescription
from launch.actions import DeclareLaunchArgument
from launch.actions import IncludeLaunchDescription
from launch.conditions import IfCondition
from launch.launch_description_sources import PythonLaunchDescriptionSource
from launch.substitutions import LaunchConfiguration
from launch_ros.actions import Node


def generate_launch_description():

    pkg_box_bot_gazebo = get_package_share_directory('box_bot_gazebo')
    pkg_box_bot_description = get_package_share_directory('box_bot_description')

    # Start World
    start_world = IncludeLaunchDescription(
        PythonLaunchDescriptionSource(
            os.path.join(pkg_box_bot_gazebo, 'launch', 'start_world_launch.py'),
        )
    )
    # Spawn the robot
    spawn_robot_world = IncludeLaunchDescription(
        PythonLaunchDescriptionSource(
            os.path.join(pkg_box_bot_description, 'launch', 'spawn_robot_launch_v3.launch.py'),
        )
    )

    return LaunchDescription([
        start_world,
        spawn_robot_world
    ])
The launch file above does two things:
- Spawns the world, by calling the launch file that spawns the world.
- Spawns the robot, by calling the launch file that spawn the robot. This is where our interest lies. Let’s see how this is done, in the launch file
ros2_ws/src/box_bot/box_bot_description/launch/spawn_robot_launch_v3.launch.py.
ros2_ws/src/box_bot/box_bot_description/launch/spawn_robot_launch_v3.launch.py
import os
from ament_index_python.packages import get_package_share_directory
from launch import LaunchDescription
from launch.actions import DeclareLaunchArgument
from launch.substitutions import LaunchConfiguration
from launch_ros.actions import Node

def generate_launch_description():

    use_sim_time = LaunchConfiguration('use_sim_time', default='true')

    # Get the path to the URDF file
    urdf = os.path.join(get_package_share_directory('box_bot_description'), 'robot/', 'box_bot.urdf')
    assert os.path.exists(urdf), "Thebox_bot.urdf doesnt exist in "+str(urdf)

    # Open the URDF file
    with open(urdf, 'r') as infp:
        robot_desc = infp.read()

    return LaunchDescription([
        DeclareLaunchArgument(
            'use_sim_time',
            default_value='false',
            description='Use simulation (Gazebo) clock if true'),
        Node(package='box_bot_description', executable='spawn_box_bot.py', arguments=[urdf], output='screen'),
        Node(
            package='robot_state_publisher',
            executable='robot_state_publisher',
            name='robot_state_publisher',
            output='screen',
            parameters=[{'use_sim_time': use_sim_time, 'robot_description': robot_desc}],
            arguments=[urdf]),
    ])
The launch file above does two things:
- Creates a node that that spawns the box bot with the camera, taking the path to the URDF file as the argument. The node is implemented in the file
spawn_bot_bot.pyfile. We’ll look at this file next. - Creates a node that publishes the robot state. It takes the URDF file string as a parameter. This will be used by Rviz2.
ros2_ws/src/box_bot/box_bot_description/launch/spawn_box_bot.py
#!/usr/bin/python3
# -*- coding: utf-8 -*-
import os
import sys
import rclpy
from gazebo_msgs.srv import SpawnEntity

def main(args=None):
    rclpy.init(args=args)
    node = rclpy.create_node('minimal_client')
    cli = node.create_client(SpawnEntity, '/spawn_entity')

    content = ""
    if sys.argv[1] is not None:
        with open(sys.argv[1], 'r') as content_file:
            content = content_file.read()

    req = SpawnEntity.Request()
    req.name = "box_bot"
    req.xml = content
    req.robot_namespace = ""
    req.reference_frame = "world"

    while not cli.wait_for_service(timeout_sec=1.0):
        node.get_logger().info('service not available, waiting again...')

    future = cli.call_async(req)
    rclpy.spin_until_future_complete(node, future)

    if future.result() is not None:
        node.get_logger().info(
            'Result ' + str(future.result().success) + " " + future.result().status_message)
    else:
        node.get_logger().info('Service call failed %r' % (future.exception(),))

    node.destroy_node()
    rclpy.shutdown()


if __name__ == '__main__':
    main()
The file simply takes the URDF file passed to it and spawns the robot.
Now, let’s see the URDF file itself. The part that adds the camera is labelled Camera, somewhere in the middle of the file. Locate the file in the IDE:
ros2_ws/src/box_bot/box_bot_description/robot/box_bot.urdf
Step 4: Launch the Simulation and Rviz2 to see the RGB camera

Open a web shell and run the following command:
user:~$ cd ~/ros2_wsuser:~/ros2_ws$ source install/setup.bash
user:~/ros2_ws$ ros2 launch box_bot_gazebo box_bot_launch.py

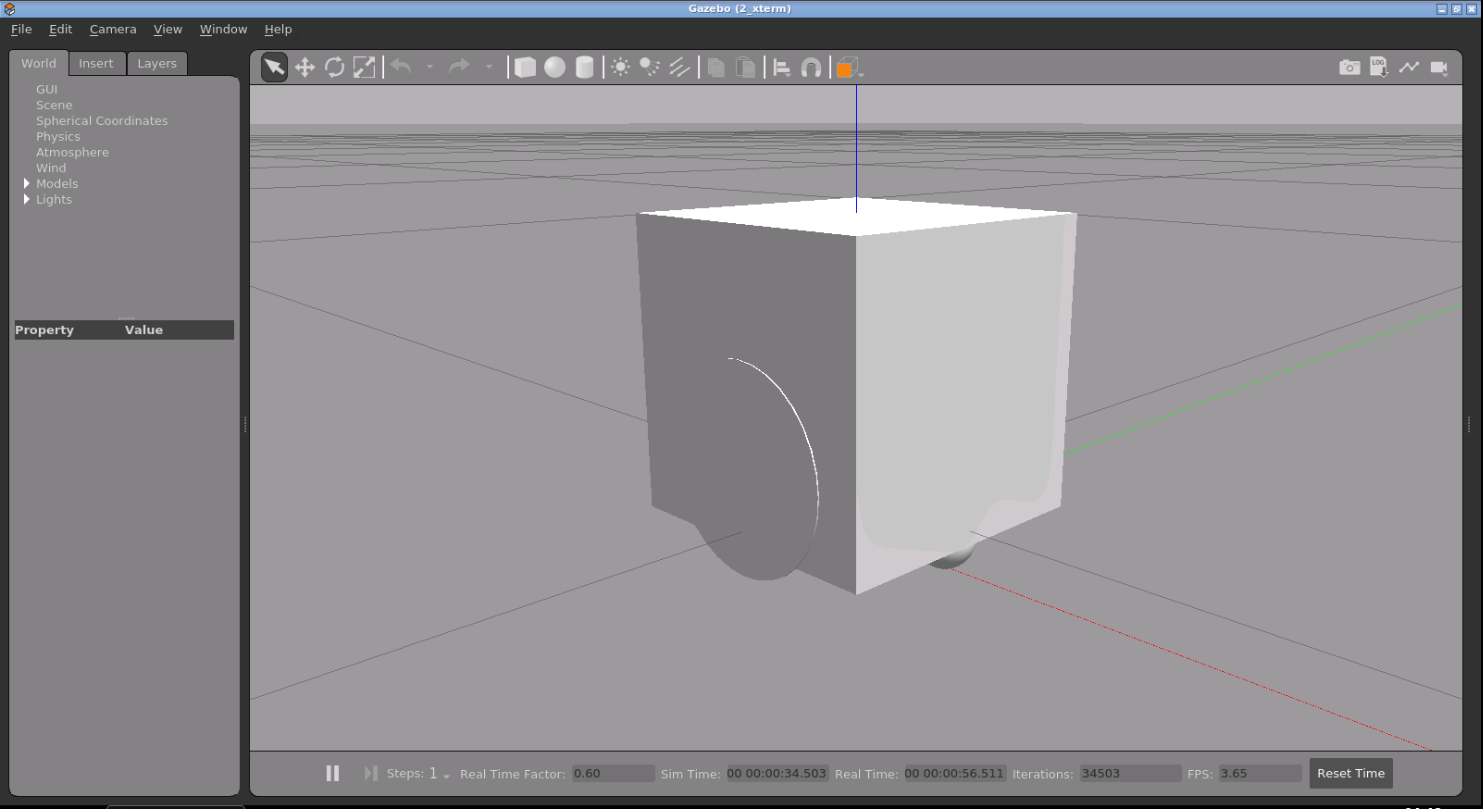
Open the Gazebo app (if it does not open automatically). You should see a simulation similar to this one:
Next, let’s launch Rviz2 to see the camera. In another web shell, type:
rviz2
Now open the graphical tools app (if it does not open automatically).

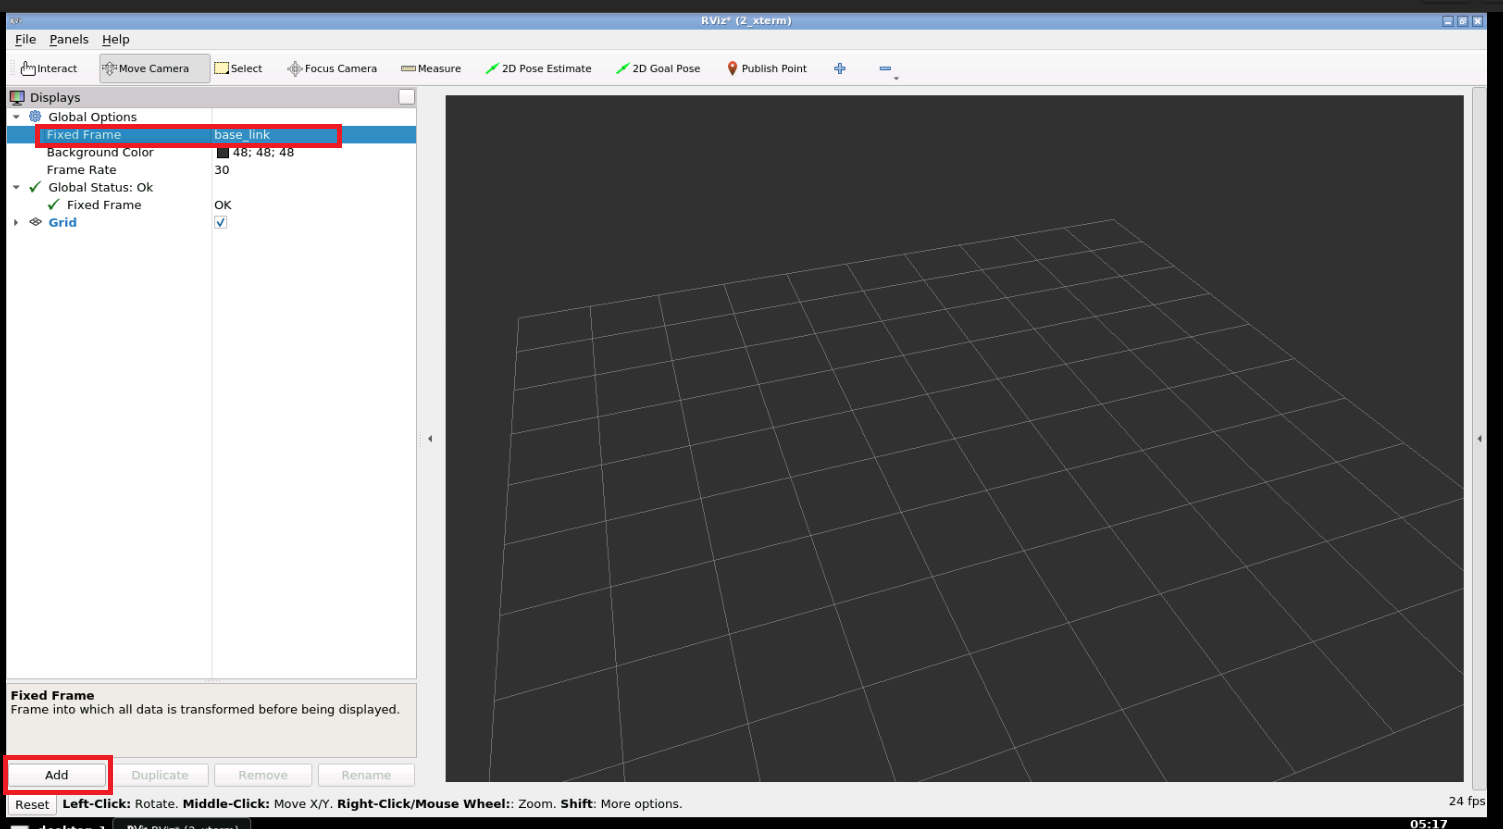
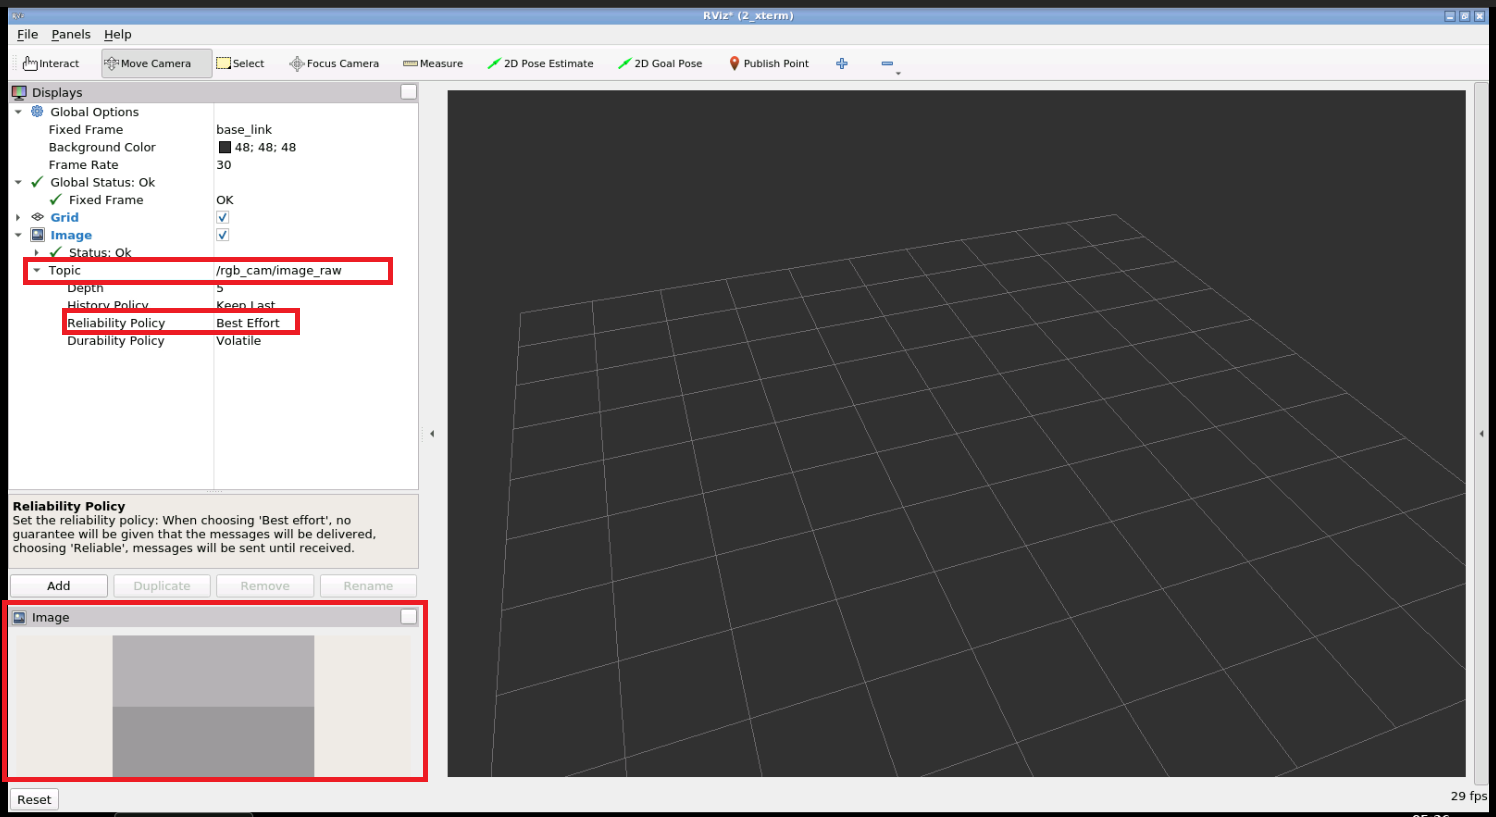
You should now see the Rviv2 window. Set the Fixed Frame to base_link and click Add to add an Image display.
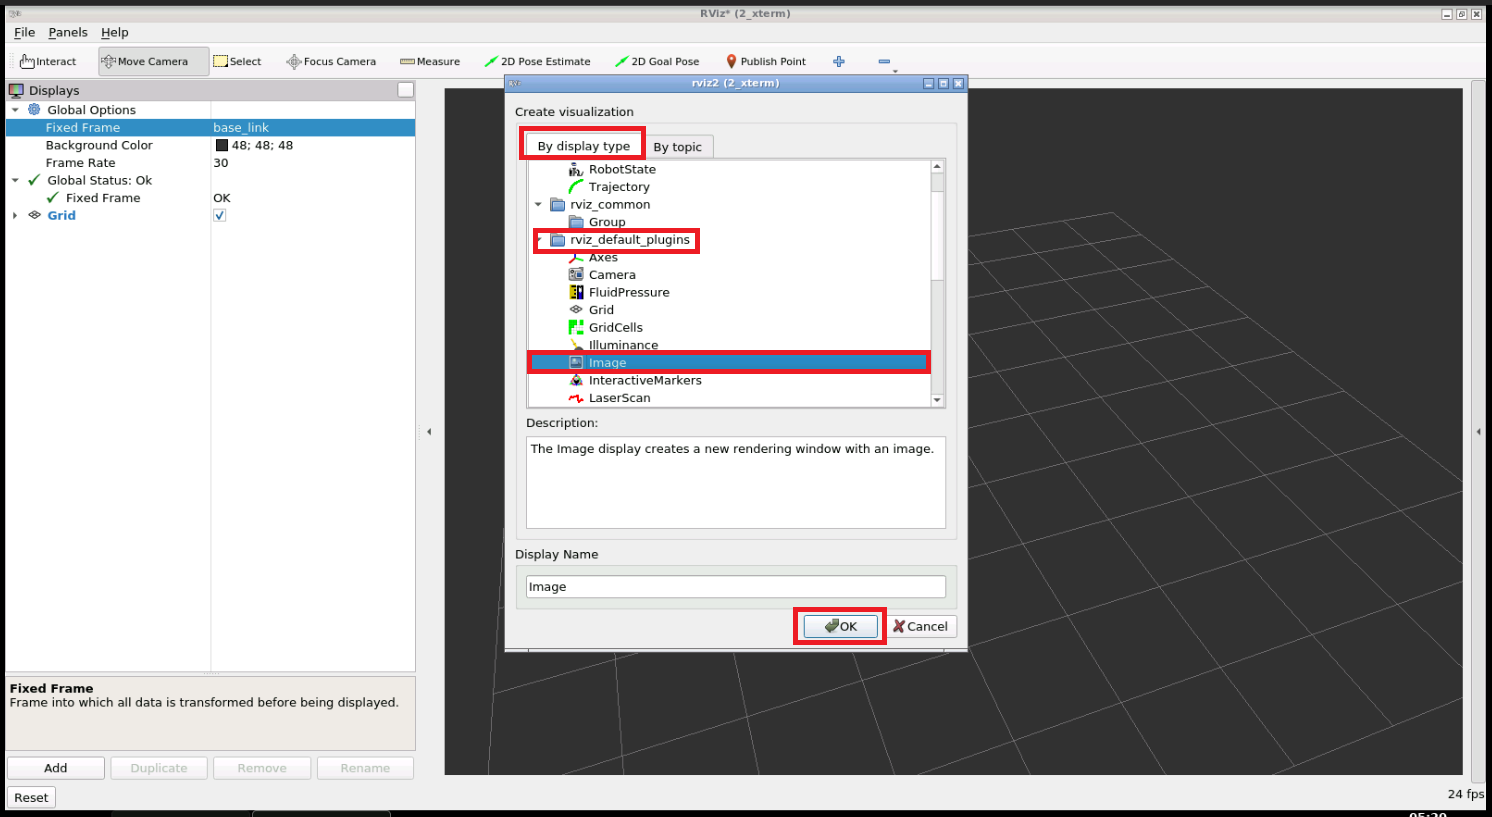
Expand the Image display, then expand the Topic property. Select the /rgb_cam/image_raw topic and set the Reliability to Best Effort. There you go!
Step 5: Consolidate your learning
Do you understand how to get an RGB camera working in ROS2 and RVIZ2? Are you able to implement a camera in your own simulation? If not, please go over the post again and maybe watch the video below? Let us know what worked for you in the comments.
Extra Step: Watch the video to see the sights and sounds version how to get an RGB camera working in ROS2 and RVIZ2
Here you go:
Related Resources
Feedback
Did you like this post? Do you have any questions about the explanations? Whatever the case, please leave a comment on the comments section below, so we can interact and learn from each other.
If you want to learn about other ROS2 topics, please let us know in the comments area and we will do a video or post about it.


0 Comments